Live algorithmic trading is possible on the Cloud. It means that the resources from the Cloud service providers can be used in trading bots, allowing the trading to run 24/7 in close monitoring.
Deploying Trading Strategies to the Cloud, Here are the Pros and Cons:
Pros:
- Accessibility – Cloud services can be easily accessed anytime and anywhere, using any device.
- Economical – It helps lower costs by cutting unnecessary expenses. It also provides a good connection since the hardware runs efficiently.
- Easy maintenance – With minimal effort and straightforward operation, you can upload any trading strategies and leave them running 24 hours a day and 7 days a week.
- Extensible – Its scalable storage allows you to store limitless data.
- Hassle-free setting up – Cloud server is easy to set up and organize.
Cons:
- Threat to security – There is a threat to security since third party stores your data.
- Requires internet connection – Cloud only works efficiently when connected to the internet. A poor connection may affect its operation.
- Privacy issue – There is no assurance that your privacy is protected.
Cloud Service
A Cloud Service refers to cloud computing services, including analytics, storage, software, database, and more. It is programmed to provide efficient, accessible, affordable IT resources and platforms for various online purposes.
Uses of Cloud Services
Cloud services for various purposes.
- Algorithmic trading
- Backup and recovery
- Big data storage
- Model training
- Test and Development
Cloud Providers
Here is a list of the major cloud providers
- Amazon Web Services (AWS)
- Google Cloud Platform
- IBM Cloud Services
- Microsoft Azure
- Oracle
- Server Space
Amazon Web Services (AWS)
Amazon Web Services (AWS) is one of the best cloud service providers with more than 200 features to offer. It allows users to select the desired operating system and programming language, as well as the web application platform.
Why use AWS?
- Affordability
- Usability
- Flexibility
- Performance
- Trustworthy
- High-speed
Why not use AWS?
- Resources may vary depending on the region
- Beginners often need help to use.
- Switching to another provider is a hassle.
- The learning curve is a big challenge.
- Cloud services have a set of cons and disadvantages.
Kraken Bot
The simplest trading strategy in using AWS is the Kraken exchange.
Learning the coding system is important. This article will explain how the strategy works.
The focus of the strategy is to buy ETH favorably once the price of the BTC increased by 5% in 5 minutes. This is done by checking the price as it changes every 5 minutes, getting the rate, and calculating the difference.
A difference of 5% or more is a signal to buy the ETH, and if it is below 5%, continue, then, with the loop.
This is what the Kraken bot trading strategy looks like.


Signing Up for the AWS Server
First step: Have an AWS account.
Click this link: to create an account: https://aws.amazon.com
Click the button “Create an AWS Account.”

Key in your email address to create a username and password.

Key in the contact information.
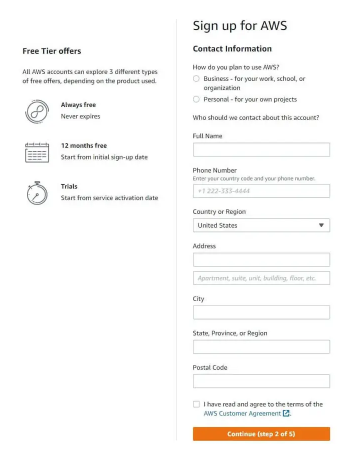
To pay for the server, you will need to key in your credit card information. You can avail of the free services and trials. A verification through SMS comes right after and then, the account is ready.
In the upper left part of the AWS Management Console page, you will see “Services.” Select and click “Lightsail.”

Find the “Create instance” button. Click it and get started.

Choose a good location
The server location and the exchange location should be aligned to ensure that the server runs smoothly and fast. This is why it is important to pick a good location.
If there is none, you can still choose and pick the one closer to your location. It is easy to get familiar with location picking, and there are ways to learn more about the exchange location, as well.
Check this link https://check-host.net/?lang=en and input the API URL of the exchange location. See how it works.
Click the Ping button to check the Ping. Look for the one with the lowest latencies. This is the best location for your exchange. In the example below, the good ones are Los Angeles and Singapore, as well as Moscow.

Now it’s time to change the AWS server location. Click and select a location with the lowest latency or one that is closest to it. In the example below, Singapore is a good pick.

For the Blueprint, you will change it to “OS only” as shown in the image below.

Next is to choose an instance and name the server. Python only requires a little space for storing and power for computing. It is best to go for the cheapest instance.

Go to the bottom of the page. Look for the “create instance” button. Clicking it signals that the creation of AWS is complete. Wait for a while until the server you created appears online.
Installing Python and Git
In an AWS server, Python and Git installation is easy. It is utilized using terminal commands. In the example shown above, the chosen instance is Linux. The commands are as follows: sudo yum install command, equivalent to Python’s command pip install.
To do the operation, all you need to do is to click the run button and the server instance will open.

This time you are in the terminal and it is time to start with the Python3 and Git installation. Before installing, check if you already have Python installed.

As shown in the image, there is Python3 installed in it and it is the latest version. If there is no Python3 installed, this is the command that you need to write:

The terminal will prompt you to pass a letter “y” to confirm that you agree to download and install Python 3 on your device.
Once confirmed, Python is now ready. The next step is to install Git. This program allows you to communicate and transact with GitHub. It means that you can send (push) and take (pull) codes through the platform.
Follow this command to install Git:

You will notice on the last line on the Terminal that it is prompting you to press “y” if you agree to install the program. Pressing “y” confirms the installation and completes the process.

Connecting AWS to GitHub
To connect AWS to GitHub, all you need to do is to use the Secure Shell or SSH method together with Git.
The process of connecting these 2 consists of 3 steps:
Step 1: Create special “keys” – API key, secret key
Step 2: Upload and submit the keys to GitHub
Step 3: Interact with GitHub using these keys
To create the keys, follow this command.

when you write the command, give it a name, too. You can leave the passphrase blank. In the image below, the name is “algotrading”.

The keys you created can be found in the folders. To find them, write the commands shown in the image. For the list of keys, write ls in the AWS instance.

The image shows that there are two keys in the folder – the “algotrading” key (private) and the API key or the public “algotrading.pub” key. is the public aka API key. You need to read the key first before you can import it to your GitHub.
write this command as shown in the image and copy the output:

To set the SSH key in your GitHub profile, go to your account settings, and then click the SSH and GPG keys.

After clicking the SSH and GPG button, you will be transferred to the SSH Keys page. In the upper right corner, you will find the “New SSH key” button in green color. Click it and put in the key. This will prompt you to key in your key and password.

This time you will instantiate the key to your AWS instance.

Finally, your AWS instance is now ready to be used. Every time you want to run it, you will need to type the two code snippets shown above in the image. It’s time to test it.
Go to GitHub repository page. You will see the green button “Code” on the upper right side. Click it to drop down, and then select SSH. Copy the URL displayed on the bar.

In your AWS instance, write these functions:

Now you have a cloned GitHub repository in your AWS instance. For confirmation, all you need to write is ls.

Installing Python packages to the AWS server
Installing Python packages to the AWS server is easy. Use the “sudo pip3 install” command. But if the code uses several dependencies, the process will be too long. Here’s what you can do to automate the process.
The code in the example uses the Kraken API. To install it, here is the command to write:

Your AWS instance reads .txt files. To export the dependencies or libraries for your script, you can make use of the “pipreqs” library.
It is used in two ways. The first one is to install it on your machine, generate its .txt file, upload the file to GitHub, and finally, pull it over to the AWS instance.
The second way to use the “pipreqs” library is to install it directly in the AWS instance and then generate the file.
Follow this command:
The documents located in your AWS instance have to be listed and honed into a file. This way you can easily generate the dependencies. In the example, Kraken-AWS file, it is written this way:
The image below shows how to create the “pipreqs” file.

For the requirements.txt file in your Kraken-AWS folder, the command to install it is shown in the image:
To go back, type this:
Using environment variables
Environment variables can be used in the AWS instance. You only need to state the values of the variables by using the export command.
Here’s how the code runs in the AWS instance:

Type “export” to set up the environmental variables. Add the name of the variable and the assigned value. See the image below:

Assign the variables and launch the script like this:

The goal is to track BTC prices and trade ETH. The file ‘log_kraken’ will be used to store logs. You can now run the strategy using this command:

You will notice that the script is already running. The logs that appear on the terminal confirm it. This time you need to read and export the logs for future use.
Reading and downloading logs
The “cat” command is the best way to read the logs from the AWS instance. Type cat followed by the file name. Also, to download those logs, simply transfer them from the AWS instance to the GitHub repository.
Check out the “log_kraken” file and read the logs using this command:

The log file has to be pushed to GitHub, but it is important to make sure that it is in the correct repository with the right name. To prepare for the added changes, type this command:
Next, confirm the changes done by following this command:

After the changes, you can now push the log files to your GitHub. Here’s the command:

Notice the GitHub repository and the added log files.
Keep the script running
The script has to keep running until you decide to delete it on an AWS Server Instance. Here is the command to keep scripts running:

Inside the screen, the strategy can continue running even if the computer and the terminal are closed. If you want to detach it from the screen, simply press CTRL + AD.
Running multiple scripts
Scripts on multiple screens can also run at the same time. This is done through the screen creation command. Even with the same name, you can run the script on each screen.
Type the following to see all screens:

For your screens to be deleted, whether you want them deleted one by one or delete them all at once, follow this command:

Making a trading Telegraph bot
When your strategy starts to run live, you desire to get notifications for each significant event.
This will help you see and know everything that happens to your investment and the strategy you are applying. Monitor your trading and follow the significant events by using the telegraph bot.
Here’s a list of the significant events:
- On start-up of strategy and on shutdown.
- On entry of trade or exit.
- On current positions of assets and price changes every 10 hours. The notification helps ensure that you are aware of the flow of the strategy.
- Whenever the margin drops to a certain level
- Whenever volatility rises at an intense threshold
- Whenever prices reached a high level
- Whenever there is a price movement of X% and more in Y minutes/hours/days
- For every logging message in Aiur
The Telegram Chat Bots make notifications for all these events.
Step 1: Search ‘Bot Father’
In the search bar, type ‘BotFather’ to search.
In Telegram, open the ‘BotFather’ and start a chat.

Step 2: Get an access token.
Type ‘newbot’ in the command.
You will be prompted to enter and type a bot name. An access token will then be sent to you. Do not share, give away, or lose the access token because this token is required when you use a bot.


Step 3: Search your new bot.
Search your new bot and start a new chat. You can just type anything to start a chat.

Step 4: Go to the URL
Go to the URL – https://api.telegram.org/botxxxxxxxxxxxxxxxx/getUpdates. With the access token you saved, replace the XXX. You will then notice a JSON structure in the chat.
Look for the “id” (not the “update_id” or “message_id”). See the picture below for reference. Note the “id” number marked with a red rectangle. Grab the number from your “id.”

Test the bot you created
Now that the bot is already created, you can send messages to it. To test if it is working, use this code snippet:

Example of a bot on a notebook:


Set the bot to private mode.
No one can chat with the bots you created.
Normally, everyone can access the bots that are created by ‘BotFather’.
Click this link to set the bots in private mode.
https://sarafian.github.io/low-code/2020/03/24/create-private-telegram-chatbot.html
want to learn how to algo trade so you can remove all emotions from trading and automate it 100%? click below to join the free discord and then join the bootcamp to get started today.